This procedure applies whether you want to migrate a mailbox from an external server to Koumbit, or migrate a mailbox from Koumbit to an external server. To keep the procedure simple, the following steps show how to migrate a mailbox from an external server to Koumbit.
Note that if the old server has several mailboxes that need to be migrated, all these mailboxes will have to be migrated at the same time. In other words, the following steps must be carried out in parallel for each mailbox to be migrated.
This procedure requires:
- Access to the domain name registrar (e.g. Gandi, GoDaddy),
- Ability to create a mailbox, which usually means access to AlternC at bureau.koumbit.net,
- A 24-hour period when you don't plan to send e-mail.
Step 0. Lower the TTL Of the DNS zone (optional)
The TTL is the "Time-to-live", i.e. the time when entries in the DNS zone are valid. The default TTL varies from one service provider to another, but is often 3600s (one hour) or 86400s (one day). For the duration of the migration, we recommend setting the TTL to 600s (ten minutes).
This TTL is set where the DNS zone is defined in the old server.
Step 1. Get the emails from the old mailbox
To do the job, we recommend Thunderbird, a free tool that works well. Note that we only use Thunderbird for the migration: once the job is done, you can uninstall Thunderbird. You can get Thunderbird here
So the first step is to get the e-mails from the old server onto your computer. Create an account in Thunderbird using the login information (servers, port, password) from the old server.
This step may take a little time, depending on the number and size of the e-mails you have on the old server.
Step 2. Create the new mailbox
On the AlternC of bureau.koumbit.net, create a mailbox with the same name as the mailbox on the old server. Don't worry, no e-mails will fall into this new box for the time being: The DNS zone still indicates that incoming e-mails should be sent to the old server, through an entry in the DNS zone called the MX entry (for Mail eXchange).
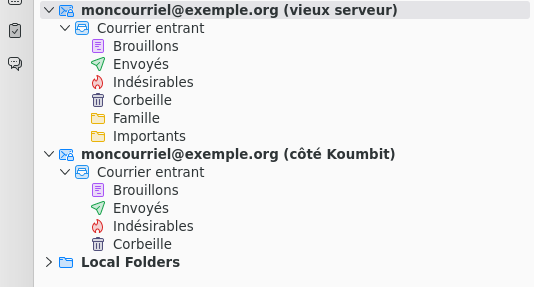
Add this new box to Thunderbird, with Koumbit's own login details. It's advisable to give it an explicit name to differentiate it from the other one. Thunderbird should then end up in a state similar to this one:

Step 3. Transfer the e-mails from the old mailbox to the new mailbox
At this point, it's possible to copy or move e-mails from the old box to the new one. Migration can be done in two ways:
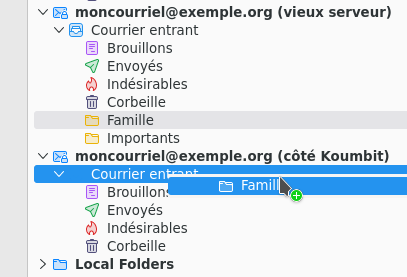
- By copying e-mails from the old mailbox to the new one: To do this, hold down the Ctrl key and click-drag the directories from the old mailbox to the new one. A small '+' symbol should appear to show that a copy is being made.

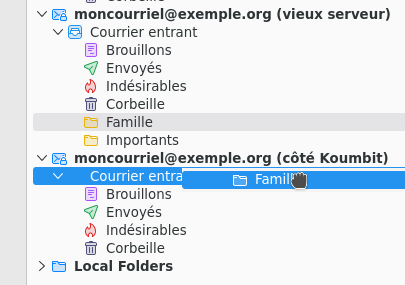
- By moving e-mails from the old mailbox to the new one: To do this, simply click-drag folders from the old box to the new one. Beware! This implies that e-mails will be deleted from the old mailbox!

Make sure you move to the right place! If you copy or move a folder from the old mailbox to a sub-folder in the new mailbox, the e-mails will be in that sub-folder in the new mailbox.
Don't forget other folders, such as the sent and draft folders.
Note that it may take a little time for e-mails to appear in the Thunderbird interface after a directory has been copied/moved.
This step may also take some time, depending on the number and size of the e-mails to be transferred.
Step 4. Direct the emails from the old server to the new server
Your e-mails are now in your new mailbox at Koumbit. However, the Internet will still send the e-mails to the old location, and the Internet expects the e-mails to leave from there. There's just one step left, and that's to change the DNS zone management from the old server to the new one.
Note that if you have a website, it must already have been migrated to Koumbit's space. It is possible to migrate only e-mails now and websites later by moving only the MX entry, but this is more complex and we recommend you contact us to find out how.
To migrate DNS zone management, you need to go to your domain name registrar (e.g. Gandi, GoDaddy). At the registrar, change the current NS (Name Servers) to those of Koumbit (ns1.koumbit.net, ns2.koumbit.net, ns3.koumbit.net).
Step 5. Migrate the last emails from the old server to the new one
Note that the changes made at the registrar are not immediate: it may take up to the maximum time defined in the TTL (see step 0). If the DNS zone in the old server was using a TTL of 86400s, then e-mails could fall randomly into the old mailbox or the new one over the next twenty-four hours. It's therefore possible that you'll receive e-mails in both places during the TTL period.
We also recommend that you avoid sending e-mails during the TTL. The Internet determines the validity of e-mails according to their origin. If it expects to receive e-mails from the old server and you try to send one from Koumbit, it may mark the e-mail as fraudulent. And vice versa, if you try to send an e-mail from the old mailbox and the Internet expects the e-mail to come from Koumbit, the e-mail could be marked as fraudulent.
After the TTL, everything should be back to normal:
- all e-mails should enter the box on the Koumbit side,
- e-mails should be sent from the Koumbit-side box.
If you see any problems after the TTL, please don't hesitate to contact us!

